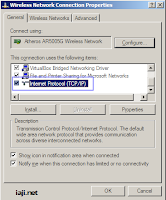
How to Fix DNS on Laptop
 If you want to connect to the Internet from the laptop computer, there might be an error regarding the improper Domain Name System or DNS settings. The DNS settings are responsible for handling how the machines get connected to the websites and the IP addresses. For fixing a DNS error, you have to change your network adapter’s settings for connecting to the right DNS servers.
•Step 1: Log on to the laptop computer with the account having administrative privileges. Note that administrators alone can modify the DNS settings.
•Step 2: Click Start menu and then click on Control Panel.
•Step 3: You have to double click on “Network Connections”; this will let you view a list of the network adapters that are available in your machine.
•Step 4: Now right click on the network adapter for connecting to the internet and then choose Properties.
•Step 5: At the top of the Properties window, you will find the General tab. Click on it.
•Step 6: From the list of services, highlight the entry that is labeled “Internet Protocol (TCP/IP)” and then click on the Properties button.
•Step 7: Next click on the radio button found next to the “Obtain DNS server address automatically” and then press OK. This will save your settings.
If you are still facing problems, you can opt for the computer repair Atlanta service for PC repair.


Nice work. Thanks for sharing this useful information. Computer Repairs Melbourne
In today's high tech world, on line computer repairs are rapidly taking a hold. Getting a computer repaired online is one of the best options because you do not have to drag your computer to a repair shop and then wait for many days to get it back.
computer repairs melbourne