How to Fix DNS on Laptop
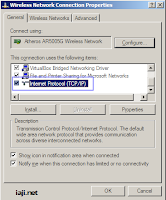
If you want to connect to the Internet from the laptop computer, there might be an error regarding the improper Domain Name System or DNS settings. The DNS settings are responsible for handling how the machines get connected to the websites and the IP addresses. For fixing a DNS error, you have to change your network adapter’s settings for connecting to the right DNS servers.

•Step 1: Log on to the laptop computer with the account having administrative privileges. Note that administrators alone can modify the DNS settings.

•Step 2: Click Start menu and then click on Control Panel.

•Step 3: You have to double click on “Network Connections”; this will let you view a list of the network adapters that are available in your machine.

•Step 4: Now right click on the network adapter for connecting to the internet and then choose Properties.

•Step 5: At the top of the Properties window, you will find the General tab. Click on it.

•Step 6: From the list of services, highlight the entry that is labeled “Internet Protocol (TCP/IP)” and then click on the Properties button.
•Step 7: Next click on the radio button found next to the “Obtain DNS server address automatically” and then press OK. This will save your settings.

If you are still facing problems, you can opt for the computer repair Atlanta service for PC repair.
How to Perform Driver Updates for XP

Driver updates are often necessary else you might be facing program crashes, bad sound output, screen death and data loss too. This can result in loss of time, data as well as money. You need to follow certain steps for performing driver updates in XP.

•Step 1: Identify the version of the driver that is installed in your system. Click on Start menu, go to My Computer and choose the Set Program Access and Defaults option.

•Step 2: Now click on Control Panel and you will find a list of applications in two vertical columns.

•Step 3: Choose the Performance and Maintenance option from the list of options available.

•Step 4: You will get a new window showing some more options; you have to select “See basic information about your computer” option under the “Pick a task…” category.

•Step 5: Now there will be a smaller window, where you have to choose the Hardware option. Make sure you select “Device Manager” from the Hardware tab and then click on “Display Adaptor”.

•Step 6: Now you can click on the contents for viewing all the information on the installed drivers. Choose “Update Drivers” for automatically updating the driver for XP. In the new window that appears, choose “Yes, this time only” and click on “Next” option. The wizard will now find the latest version of the device driver.

If you find that you are facing problems, you can immediately contact the computer repair San Francisco service for technical support.

How to Format an External Hard Drive on Windows ?

When you want to format an external hard drive, make sure that you maintain a check on your machine’s file system. For external hard drives, all the operating systems of Windows support two file systems, which are FAT32 and NTFS. File system NTFS is better as it supports larger files of more than 4GB; this gives you space for your backup. You need to follow a step by step approach in formatting your external hard drive.

•Step 1: Log in as Administrator when you start your system

•Step 2: Click on the Start menu

•Step 3: Right click on My Computer and select Manage from the options available

•Step 4: For starting the formatting, right click on your hard drive; it will be E drive or F drive.
You have to choose Format from the options available.

•Step 5: A dialog box will appear where you have to type a name of your external hard drive as well as selecting the file system. Just type NTFS and then click on OK.

•Step 6: You will get another dialog box warning you about erasing all the data available in the hard drive. Click again on OK and just let it format

•Step 7: Wait for some time and your external hard drive will be formatted. You will now have an empty hard drive for filling with data.

If you still face problems in external hard drive formatting, you may contact computer repair Los Angeles service for technical support.

How to Take a Screen Capture ?

Screen shots are often necessary; they play the role of a guide for performing troubleshooting in details, document presentations and emails. The screen shots are also very handy for passing on information which is related to operation and use of a new application or software. Screen captures or screen shots are usually used in the IT companies, where numerous employees have to be informed about the use of a newly introduced software application.

•Step 1: Press the Print Screen button on the upper right side of your computer keyboard. In case you have an extended keyboard, you will find the PrtScn button with the Insert, Delete and Scroll Lock buttons.

•Step 2: After you have hit the Print Screen button, the screen capture will be taken. Note that there will be no pop-up message telling you that the capture was successful.

•Step 3: Now execute the paste command in a Word Processor or Windows Clipboard; the screen shot will get pasted in the document for usage.

•Step 4: If you want to capture the screen without the taskbar, you will have to press the Print Screen button together with the Alt button.

If you find that you are not being able to capture the screen, you may contact computer repair Brooklyn for PC help.

How to Close Internet Explorer When Not Working?


It may often happen that you are using Internet Explorer and the browser got stuck suddenly rendering all your attempts to close it futile. Know what steps must be taken to help close it.

•Step 1: Try right clicking on the Task Bar, which you will find at the bottom of your computer screen. Then click on Processes and select Internet explorer from the list that is provided. Your next attempt will be to click on End Process. Task Manager can also be accessed by pressing CTRL+ALT+DEL.

•Step2:Deletethe HKEY_LOCAL_MACHINE\SOFTWARE\Microsoft\Windows\CurrentVersion\Explorer\Browser helper objects registry entry. Now try relaunching Internet Explorer.

•Step 3: Go to the Start menu, access Control Panel and then go to Add/Remove Programs. You have to click on Internet Explorer and then click on Remove option. You will also get the Repair option, which you can click. You may cross out the browser and then end the process by accessing Task Manager.

•Step 4: Now right click on Internet Explorer window and then click on Close which is at the end of the menu. If more windows for End Program appear, you have to click the End Program button.

It will also be beneficial to reinstall Internet Explorer on your machine. Go to the Start menu, access Control Panel, and select Network and Internet and then choose Network and Sharing Center. You will then have to select Internet Options and click Advanced for disabling GPU Rendering and enabling Use Software Rendering. If the afore mentioned steps do not work, please contact a computer repair New York service provider for tech support.

How to Recover Deleted Data from MAC

Mac is also prone to data loss like the other operating systems. You may have functional backups created so that there are no chances of data loss.

You must make sure that the backup data is stored to an external storage device such as CD, external hard drive or DVD. It is also necessary to eject the removable storage device in a safe manner; else it might affect the copying process adversely. Make sure that the CD or DVD where you are copying the data is functional, so that there are no scratches. Avoid copying the data to a flash drive; this might result in getting damaged or misplaced.

You can recover deleted data from Mac through the usage of specialized Mac data recovery software. You must have the right software; the wrong software will do more harm than good.

•Step 1: The Mac data recovery software should be able to recover data from HFSX and HFS+ file systems.

•Step 2: the software is actually able to recover data when a volume is formatted/reformatted, deleted folders and files, volume that does not mount, catalog or partition map is corrupted, or when the volume is not accessible after re-partitioning or repair tools and the disk verify tool failure.

•Step 3: The software enables you to preview files before data is recovered and is read only.

•Step 4: The recovered data can be stored to another storage device after following the instructions provided by the software.

•Step 5: Do not use the computer immediately after deleting the data.


If problems still persist, you can contact the computer repair Miami service. Such online computer repair services will help offer excellent solutions to all computer problems.

How to Clear Internet Surfing History and Cache

You may often want to clear the Internet history in Internet Explorer, especially when it is not your own system and you do not want the other users to find out what websites you have gone through. If the computer is your office property or may be your friend’s, and there is no software to clear the Internet history, you may just try doing the job manually. Let’s find out how to go about it.

• Step 1: Go to the Tools menu and click on Internet Options

• Step 2: Now click on the General tab

• Step 3: Click on Delete Cookies, Delete Files, and Clear Cache options. By doing so, you delete all the temporary Internet surfing files

• Step 4: Then click on Settings and you will find a window appear

• Step 5: Now click on the View Files option and another window appears

• Step 6: Access the Edit menu and then select the Select All option; now hit the Shift + Delete buttons on your keyboard

• Step 7: Close the Window and return to the Settings window on Internet Explorer

• Step 8: Now you have to click on the View Objects option for opening another window

• Step 9: Go to the Edit menu once more and choose the Select All option, and now press both the Shift and Delete buttons together on your keyboard.

• Step 10: Your surfing history should be cleared now.

If you still need help and tech support in repairing your computer problems, you can opt for the computer repair San Diego service.
powered by Blogger | WordPress by Newwpthemes | Converted by BloggerTheme