Steps to Adding Administrative Tools to the Start Menu

If you are a Windows XP user, you may feel the need of using the Windows XP Administrative tools quite often. When you are regularly using the tools like the Computer Management tool, the Event Viewer, Component Services and other Windows XP Administrative tools, you may want to have some shortcuts so that you can access these tools faster whenever you need them. The shortcuts will ensure that you do not have to open the Control Panel every now and then for accessing the Administrative tools. For making the shortcut, you may ask for the help of an online technical support provider or follow certain steps.
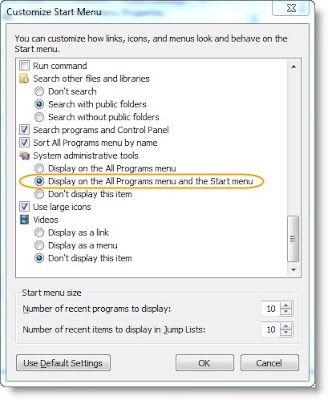
Customize Start Menu• Step 1: Right click on the Start menu button and select Properties from the list that appears. This will open the “Start Menu and Taskbar Properties” window.

• Step 2: Now click on the ”Customize” option. This enables the ”Customize Start Menu” window to open.

• Step 3: Click on the ”Advanced” tab

• Step 4: Go to the ”Start Menu Items” scroll box. From here, you will have to navigate to the section labeled ”System Administrative Tools”

• Step 5: Now you must select the “Display on All Programs menu and Start menu” option and then click OK for exiting the window

• Step 6: You must click on OK for a second time to exit the “Start menu and Taskbar Properties” window.

This should work, and if it’s not working, contact the computer repair San Diego service for help.

Steps to Changing the Windows XP Color Scheme

You may not be satisfied with the old look of your Windows XP computer system and may be craving for a new look. Changing the Windows XP color scheme can be a brilliant idea in giving your computer a new look. Note that achieving this is not a very difficult task and can be done by following some simple steps or taking the help of an online PC repair service.

When you change the color scheme, you will find that the color of the taskbar and the title bar will change. The color of the folder sidebars, Start menu, as well as other elements will also change. Note that Windows XP is configured for using the blue color scheme by default; however, there are two other schemes available, one is the Silver scheme and the other is the Olive Green scheme.

Windows XP Color Scheme• Step 1: Right click on an open spot in your desktop, and choose “Properties” from the list of options. This will open the “Display Properties” window

• Step 2: Now click on the “Appearance” tab

• Step 3: Under the Color Scheme category, you will find a drop down list from where you have to choose the color you desire

• Step 4: Now click on “Apply” for implementing the change and then click “OK”. This change will take just a moment.

This should enable your system to use the color scheme you have chosen. You may also ask for the services of computer repair New York for helping you with any computer related issues.

Know How to Remove Run from the Start Menu

If you use the computer, you will know that the Run command in Windows is easily accessible through the Start menu. The Run tool offers access to a list of previously used commands, and also access to advanced tools like the Registry Editor; your child may also play with tools like the System configuration Utility and the Registry Editor and wreak havoc with the normal functioning of your system.

If you have to share your machine with children and people who have no experience on using the Run command, it will be better to get rid of the Run command from the Windows Start menu. You may follow certain simple steps to make this happen.

Remove Run from the Start Menu
• Step 1: Right click on the Start menu and click on “Properties” for opening the "Taskbar and Start Menu Properties" window.
• Step 2: You now have to click on the “Customize” option for opening the “Customize Start Menu” window.

• Step 3: You will find the “Advanced” tab; click on it.

• Step 4: From the "Start menu items" list that appears, scroll down and uncheck the box labeled “Run command”.

• Step 5: Now click on “OK” for exiting the “Customize Start Menu” window. Click “OK” again for "Taskbar and Start Menu Properties" window.

These steps should make the Run command disappear from the Start menu, however you may access the Run command by pressing the Windows Key + R on your keyboard. If problems persist, you may contact an online computer support provider like the computer repair Miami service for assistance.

How to Adjust Visual Effects in Windows XP

If you are using the Windows XP operating system, you may want to adjust the visual effects for ensuring your computer system’s best performance. The loss in the aesthetic appeal of Windows XP is welcome since you get to use a more responsive system.

Visual Effects in Windows XPStep 1: Right click on “My Computer” icon that you will find located on your desktop. You can also get the icon by clicking on the Start menu.

Step 2: Now select “Properties” from the list of options and open the “System Properties” window by clicking on it

Step 3: In the System Properties window click on the “Advanced” tab

Step 4: There will be a section labeled “Performance”; you must click on the “Settings” button in that section. This will enable you to open the “Performance Options” window.

Step 5: You will find the “Visual Effects” tab where you must click on the option called “Adjust for best performance”

Step 6: Now click on “OK”. Your computer will take some time for making the visual effect adjustment, during which the screen may go black and white.

Step 7: At the completion of the adjustment process, the window will close.

Step 8: Now go to the “System Properties” window and click on OK for exiting.

If you are still facing problems in achieving the task, you may contact a remote computer repair service provider for offering you technical support.

How to Create Windows XP Shortcuts

Windows XPYou may have often noticed that some Windows XP icons on the desktop have a curly little black arrow at the corner. A number of the shortcuts in Windows XP are created when programs have been installed. Often you will find that the programs keep asking you if you want to get the Windows XP desktop shortcut installed for the particular program.
You can have shortcuts to your folders, pictures, your favorite websites as well as video libraries. You can create the shortcuts from your desktop.

Windows XP Shortcuts• Step 1: On an empty spot on your desktop right-click with your mouse.

• Step 2: You will find a little window. From the options available, click on “new.”

• Step 3: You will get another window that says “Shortcut”. You must left-click on this with your mouse.

• Step 4: You will get another window appearing that says “Create Shortcut.”

• Step 5: This will allow you to browse to a location and then create shortcuts to images, folders and videos.

• Step 6: After getting your item click on “Next.”

• Step 7: You will get a window that lets you change the name of the Windows XP shortcut that you have created.

• Step 8: The final step will be to click on “Finish” for creating your Windows XP shortcut.

If you find that there are problems, you can contact the computer repair Brooklyn service for technical support.

How to Confirm That File System or Hard Disk Is Not Damaged in Windows XP

If you are using Windows XP operating system and your machine shuts down too often, then you can solve the issue by starting your system from the Windows XP CD-ROM. You have to load the Microsoft Recovery Console and use CHKDSK command line utility. It is important to note that for using the Recovery Console, you have to know the administrator’s password; else, you can seek the services of an online technical support provider.
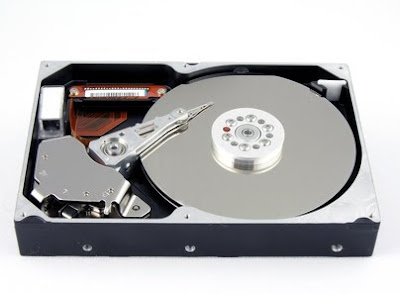
Hard Disk
• Step 1: Click on the start menu and then click on Run. Now you will get an open text box, where you have to type “cmd”. Then press the Enter key.

• Step 2: You will get a command prompt screen. In case you want CHKDSK to run in the read-only mode, you have to type CHKDSK c. If you want CHKDSK not to check the bad sectors, but to fix the errors, type CHKDSK c:/f

• Step 3: Type CHKDSK c:/r or CHKDSK c:/p and then press Enter, if you want the CHKDSK command to locate the bad sectors in your hard drive and recover still readable data.

• Step 4: If the CHKDSK command says that your hard disk cannot be accessed, there may be a hardware failure. In this case, check all jumper settings in your drive and cable connections.

• Step 5: If the command says that it was unable to fix the hard drive problems, the Master Boot Record or file system may be damaged.

If you are not able to locate problems or solve it, you can contact the computer repair Atlanta service for help.

Tips to Change the Size of the Default XP Font

If you find that the default Windows XP font size is too large or too small, know that you can change the size of the font as you wish to. If you are not confident in doing this yourself, you can always avail an online computer repair service.

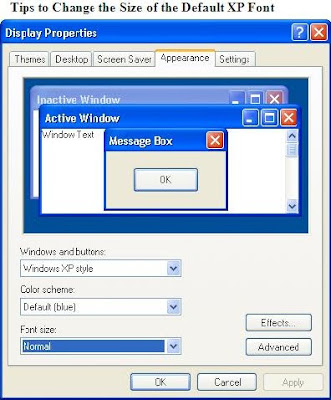
Windows XP font size• Step 1: Save your desktop theme. This will help restore the original behavior of Windows XP operating system

• Step 2: Click on the Start menu and go to Control Panel. Then click on the Display icon for opening it.

• Step 3: You will get the Appearance tab, where you have to click on a new font size under Font size category.

Step 4: You will now be able to enlarge the fonts that are used in window headers, menus and icon labels.

• Step 5: The default system font must be changed for changing the actual font. Change it to something better in the registry.

Note that the Windows Fonts should be deleted in case your machine has less RAM and numerous fonts. Prior to handling fonts, you must create a System Restore point. The System Restore tool will help your machine return to a previous functioning order if you have deleted a wrong font by mistake.

You can avail services from computer repair San Francisco for dealing with font problems in Windows operating system.

Enhancing Downloading and Browsing Speed with Windows Vista

Windows VistaIt has been found that when you are using IE7 on windows Vista, the browsing of websites may get very slow and the downloading speed also gets slow. This issue can be solved if you change the Windows Scaling factor to 2. For doing this you have to follow certain steps.

• Step 1: Click on Start menu and then click on Run.

• Step 2: Now type CMD.

• Step 3: For opening the command prompt with Administrative rights, press CTRL+SHIFT+ENTER keys on the keyboard.

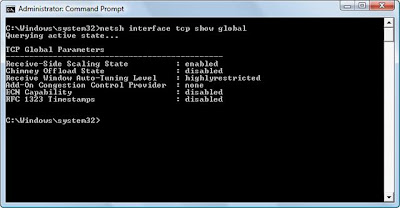
• Step 4: When the command prompt window opens, type “netsh interface tcp set global autotuninglevel=highlyrestricted”. Then press Enter.

Vista Boost Browse Speed
• Step 5: Your autotuning level will now be set to “Allow the receive window to grow beyond its default value, but do so very conservatively”. Reboot your machine for the setting to be effective.

• Step 6: The setting can be restored back to the default; you have to type “netsh interface tcp set global autotuninglevel=normal”. Restart your system.

• Step 7: In case you want to disable the autotuning, you have to type the command “netsh int tcp set global autotuninglevel=disable” and reboot your computer.

• Step 8: After disabling the autotuning feature, the threaded network downloads will speed up.
If problems still persist, you can contact the computer repair New York service for online computer support.
powered by Blogger | WordPress by Newwpthemes | Converted by BloggerTheme